There are a few simple steps to get GitHub Issue Lookup working in MettleCI Workbench
Register MettleCI Workbench as a GitHub OAuth Application
Register your MettleCI Workbench instance as an authorised Application in GitHub.
Note that there’s a slightly confusing configuration dependency here:
MettleCI Workbench requires you to provide a GitHub OAuth Client ID & Secret in order to provide a Workbench Callback URL but a Workbench Callback URL is required by GitHub in order to provide you with an Application ID! i.e.
-
GitHub Application Credentials → (requires) → Workbench Callback URL
-
Workbench Callback URL → (requires) → GitHub Application Credentials
We address this by entering a provisional Workbench Callback URL when initially defining the GitHub Application, and returning later to update it with the actual Callback URL provided by the MettleCI Workbench.
When creating an OAuth application in GitHub you have two options:
-
Create an OAuth application owned by your GitHub User Account, or
-
Create an OAuth application owned by your GitHub Organisation.
MettleCI Workbench will work equally well with both without difference. In either case, the OAuth application’s details will be entered into MettleCI Workbench (described below) and associated with DataStage projects by creating one or more named Work Item Service integration definitions.
Note that when the MettleCI Workbench application accesses your GitHub repository it does so under the auspices of the user whose account is currently authenticated to GitHub in your browser. For this reason you should ensure your browser has successfully authenticated to GitHub (and has an active session cookie) before using MettleCI Workbench GitHub Issue Lookup.
Create your GitHib OAuth Application
-
From within the GitHub interface go to the settings page relevant to the level at which you want to create your OAuth Application.
-
To create an app owned by your User Account, click your user avatar (in the top right) and select → Settings → Developer Settings → OAuth Apps and then click New OAuth App.
-
To create an app owned by an Organisation, click your user avatar (in the top right) and select → Organizations. Alongside the Organization for which you wish to create the OAuth application select Settings → Developer Settings → OAuth Apps and then click New OAuth App.
-
-
On the resulting page, enter your application details:
-
A descriptive name.
-
The URL of the homepage of your MettleCI Workbench application. (e.g.
https://my-engine.my-organisation.com:8443). Note that this URL needs to be accessible by your GitHib platform. You should also ensure you include the Workbench port number in the URL. -
A description of your OAuth application.
-
a provisional callback URL. This is the MettleCI Workbench URL that GitHub will use to communicate with Workbench.
-
We’ll come back and modify this value later. For now just use the same value you entered for the URL of the homepage of your MettleCI Workbench application, above.
-
-
Leave the Enable Device Flow option disabled.
-
Click Register application.
-
-
On the resulting page select Generate a new client secret.
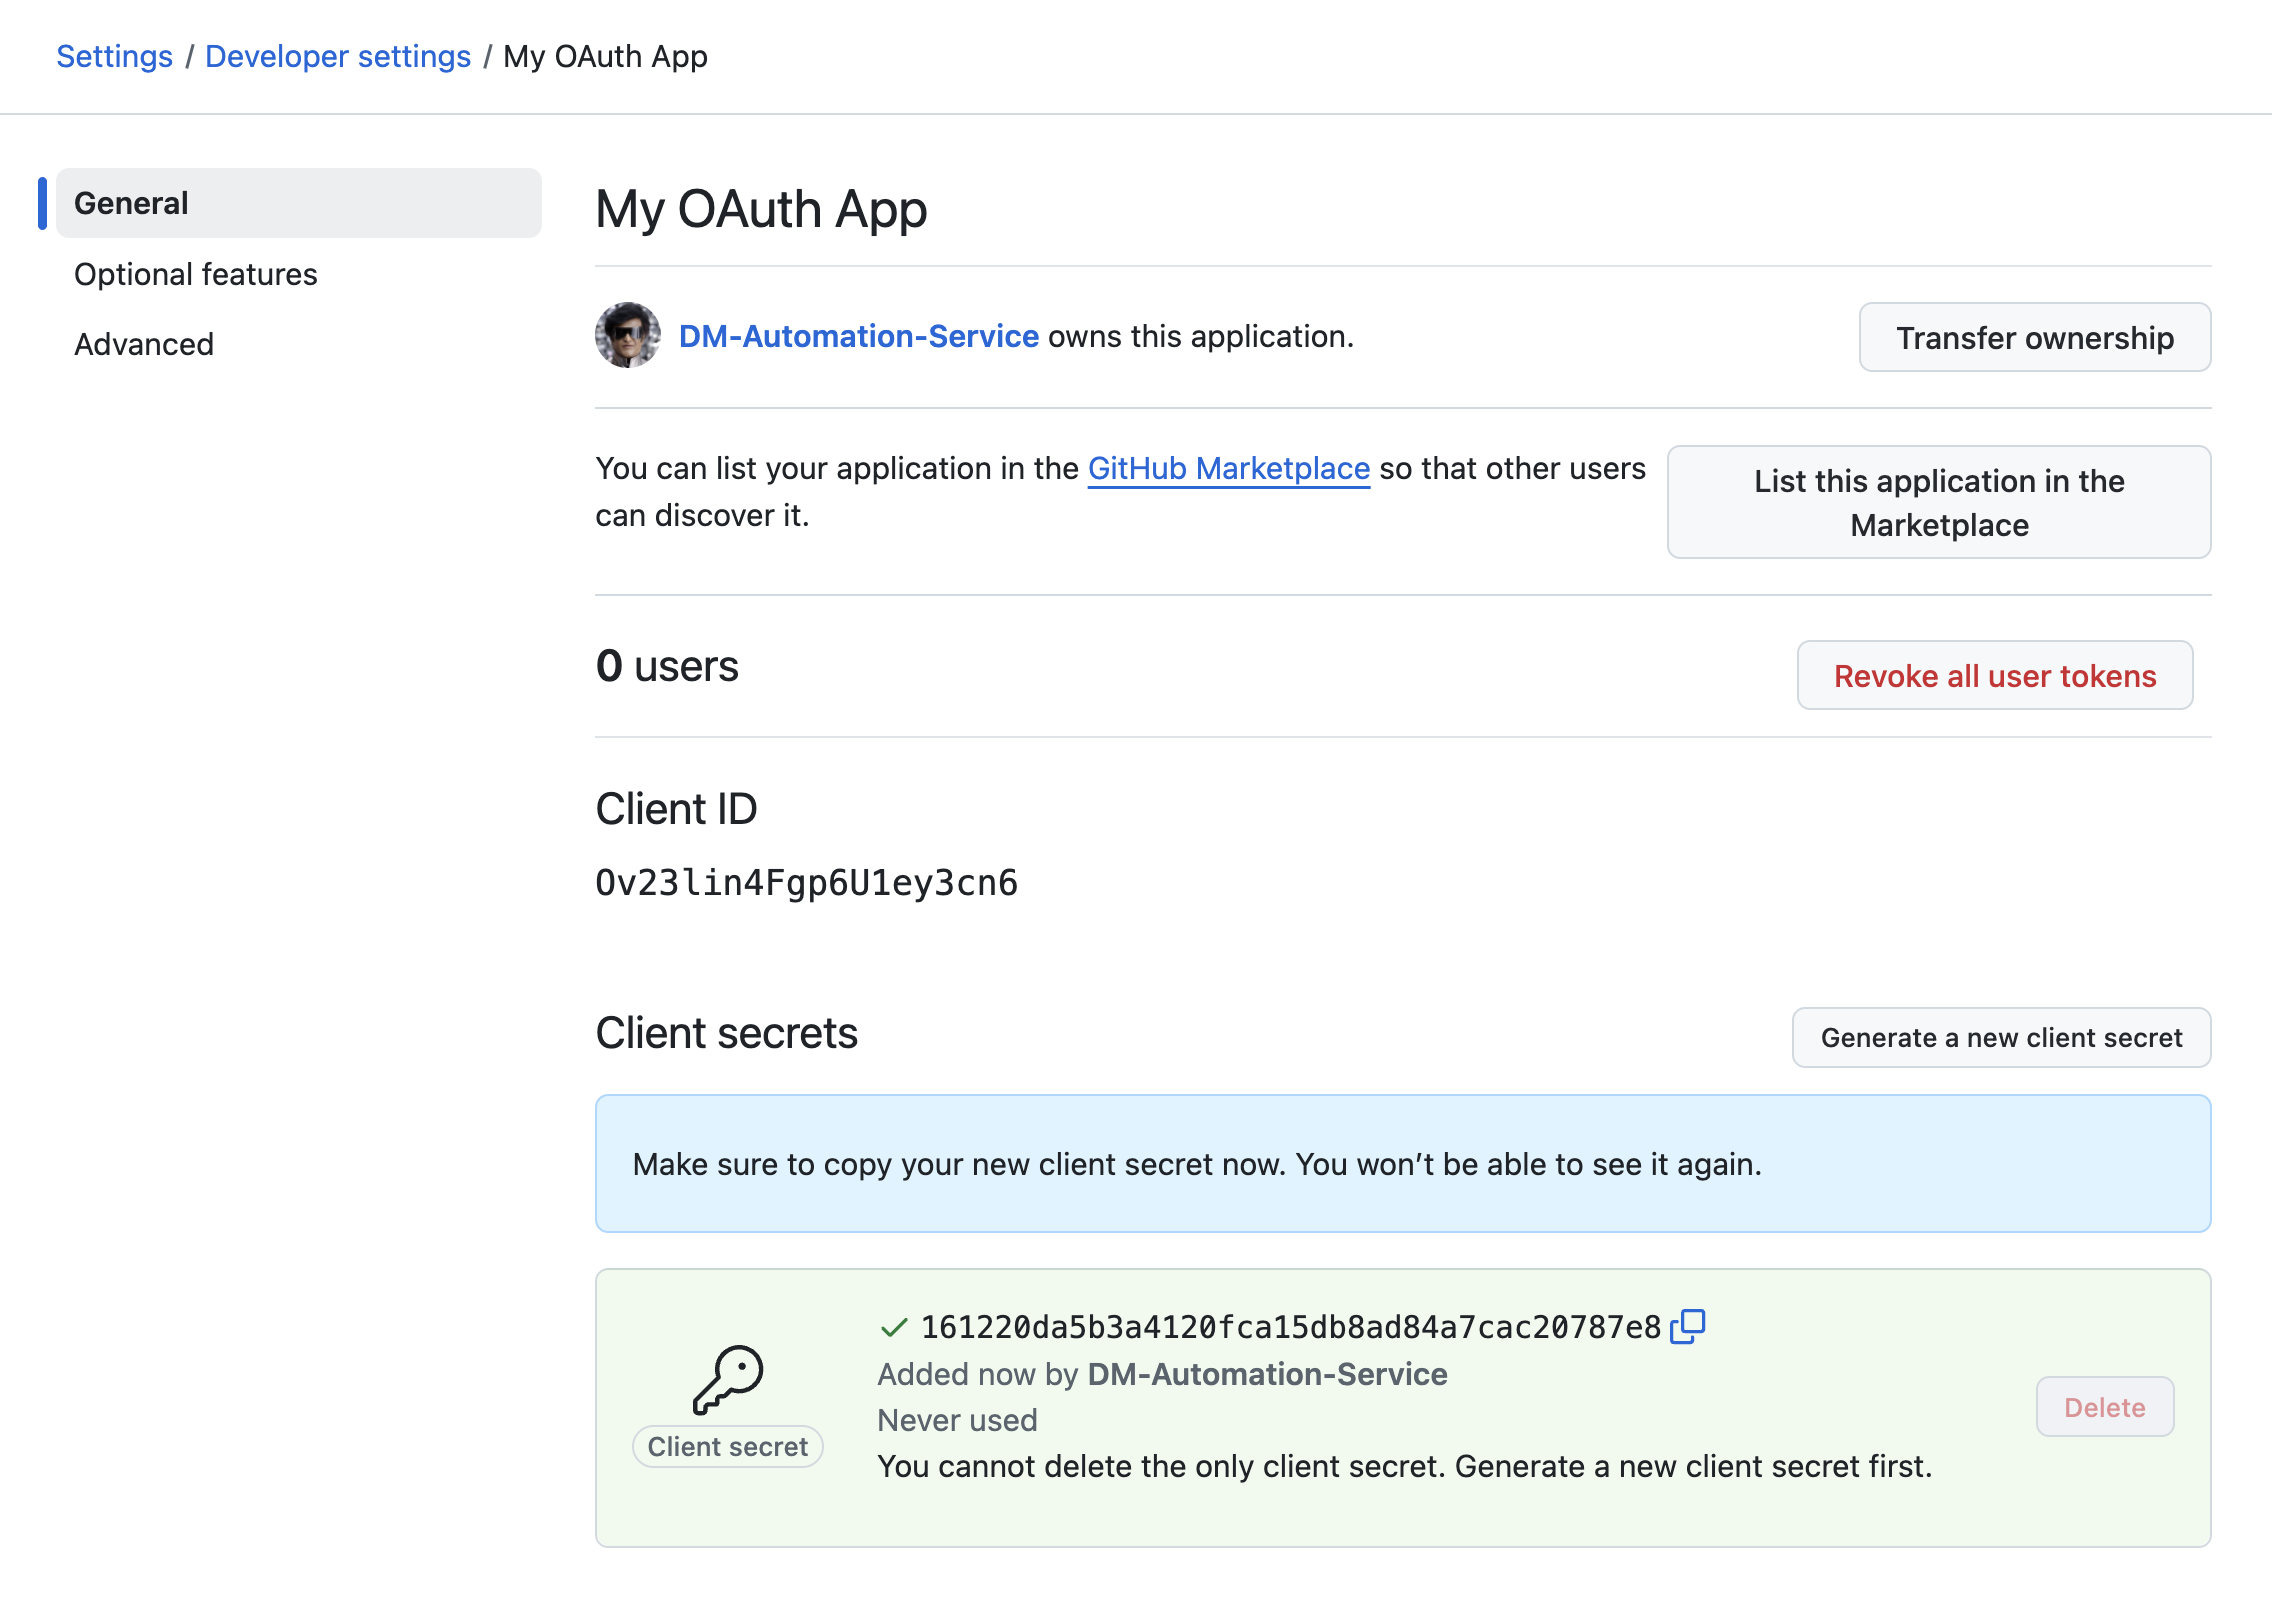
-
Make a note of the Client ID and Client Secret. You’ll need these in a later step.
-
In MettleCI Workbench: From your user menu select Profile and settings, then select the Work Items tab, on the left.
-
You’re about to create a named Work Item Service integration using the OAuth Application you’ve just created which will enable Workbench to search for GitHub issues in a specific GitHub repository. Note that one GitHub OAuth application can support the creation of multiple distinct Work Item Service integration definitions in MettleCI Workbench, each of which is used to search for issues in different GitHub repositories. You should only need to create a single OAuth application for each MettleCI Workbench instance.
-
Select Add integration and complete the details on the resulting page …
-
Name: Give your integration a name (the name of the associated repository is normally a good choice)
-
Work item service: and select GitHub from the drop down list of supported Work Item Lookup providers.
-
GitHub base URL: This is
https://github.com(if you are using a GitHub SaaS plan) or the URL of your self-hosted GitHub Enterprise instance (e.g.https://github.myorg.com) -
GitHub Client id and Client secret: The values you saved in Step 4, above, when creating your OAuth application in GitHub.
-
-
You’ll also need to specify where your GitHub Issues are stored with the Project Path setting which has two options:
-
If you wish to associated commits with GitHub issues in the same repository in which your code is stored then leave the Same as git repository checkbox selected. This is selected by default as users performing Issue lookup in the Commit dialog will most commonly wish to reference issues stored within the same repository to which they are committing.
-
Alternatively, if you wish to associate commits in your project with issues defined in a different GitHub repository then unselect the Same as git repository checkbox and specify (a) the name of the organization or user who owns the GitHub repository hosting your issues, and (b) the name of the relevant repository.
)%20(2)-20250910-124234.png?cb=939a030bc2c87e04e6dbc858b1a8fa94)
-
-
⚠️ Ensure that you don’t associate an incompatible combination of settings with your DataStage project.
-
Click Add when you are finished.
-
Back in the Profile and settings → Work items page you’ll see a line for your newly-defined GitHub work item integration.

-
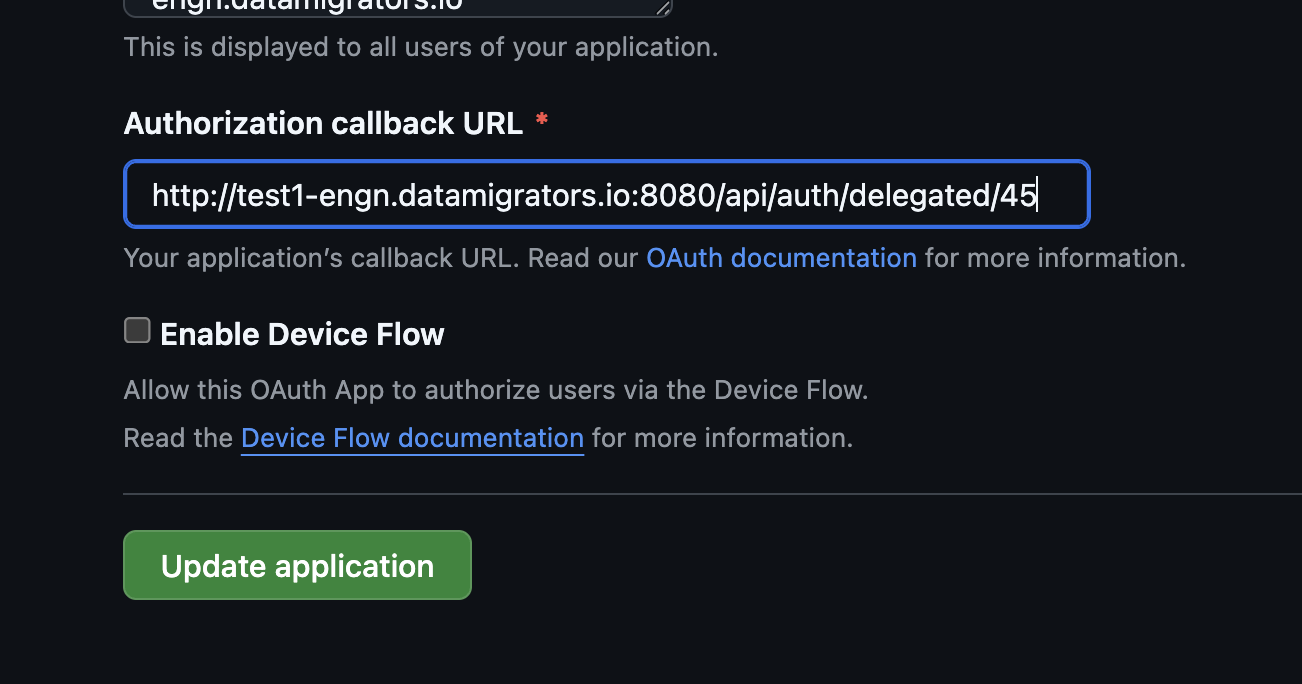
The new line will have a Callback URL value of the form
http(s)://{HOST}:{PORT}/api/auth/delegated/{INTEGER}. Use theCopy URLbutton to copy the Callback URL value. -
Back in GitHub, edit your newly-defined OAuth Application to update the Authorization callback URL with the value you just copied from Workbench, then click Update application to save your changes.
Associate your GitHub integration with a MettleCI project
-
In MettleCI Workbench select Projects then select the project whose commits you want to associate with GitHub issues.
-
Select Project settings from pop-out Project menu on the left had side of the screen.
-
On the resulting Project settings screen select the Work item tab.
-
On the Work item service integration page select the Name of the GitHub work item integration you specified in Step 7 of the previous section, then click Save.
Test your GitHub integration
-
Select Version control from pop-out Project menu on the left had side of the screen.
-
Select New commit.
-
Enter the name of one or more Assets(s) in your project and select them from the drop down menu.
-
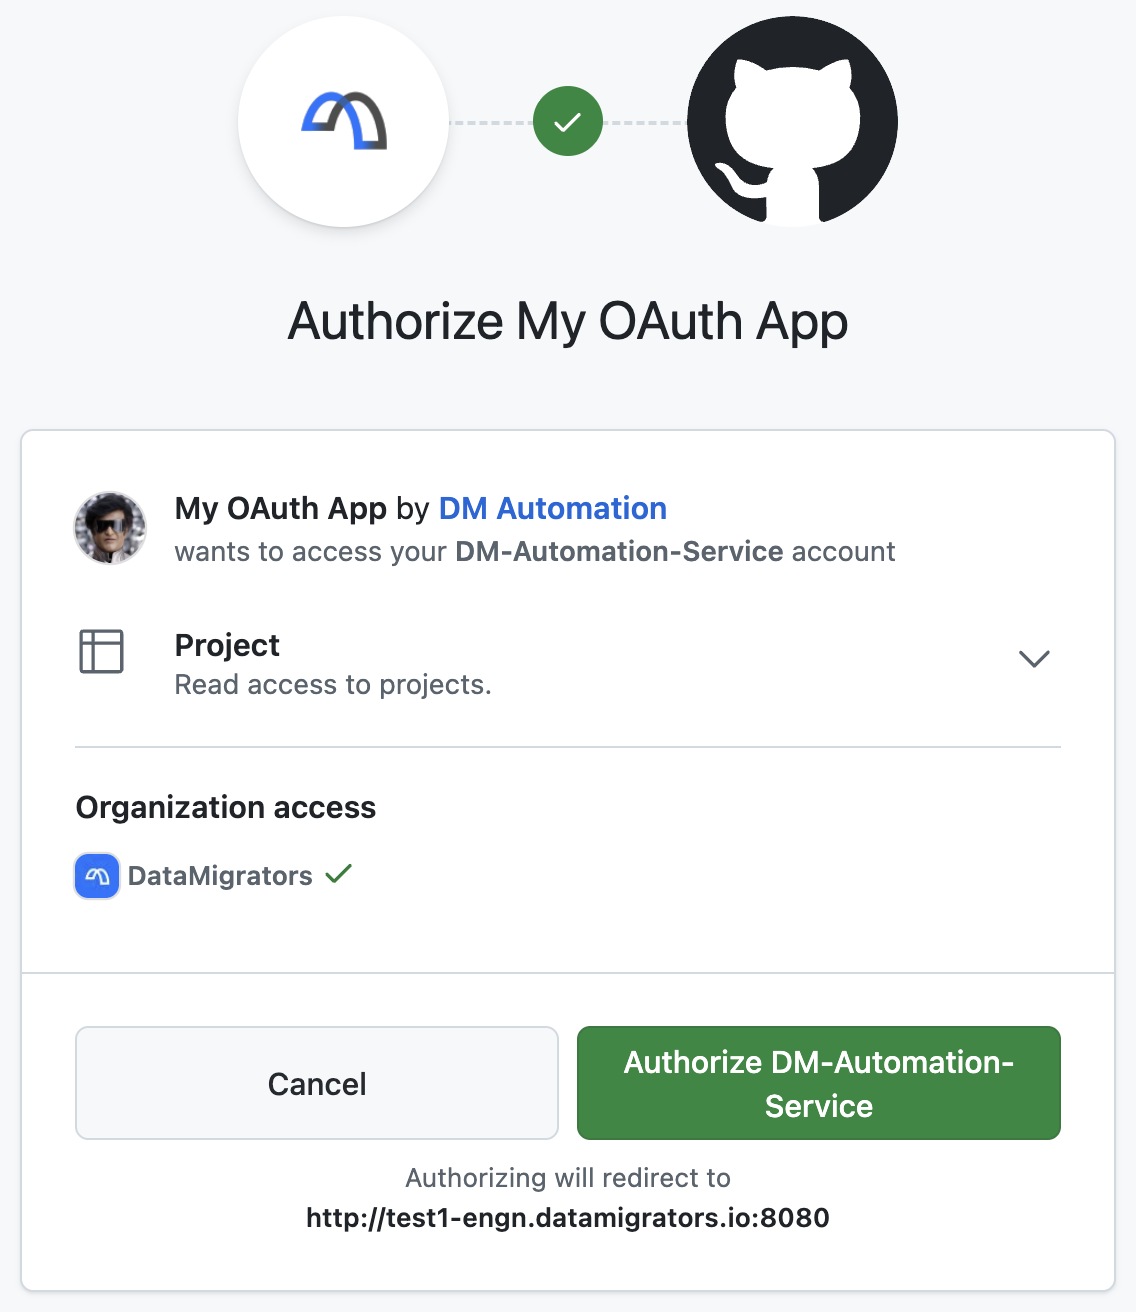
In the Work Item(s) field enter some text (minimum of 3 characters) that matches the description of one or more issues in the relevant GitHub repository. For newly-configured integrations you’ll be presented with a GitHiub authorisation dialog which you should Authorize.
-
Matching issues will be presented as options in a drop-down menu. Select one or more issue(s) you wish to associate with your commit and they’ll be added to the Work item(s) field.
-
Add a simple Commit Message then click Commit to commit your asset to the relevant repository.
-
Navigate to your commits in the appropriate branch in your GitHub repository. Select your commit and verify that the specified Issue has been associated with it.